
Getting Started
To start off, we're going to open the page for the machine we're going to own, and connect to HTB's VPN, which you can find instructions for on their website. I've taken a screenshot of the machine's webpage, and placed it below for reference.

In the picture, you can see that the IP of the system we're going to be attacking is 10.10.10.114. This is important to remember for later.
Enumeration
The enumeration step of hacking is extremely important, as we're going to have to know as much as we can about the system to know how to take advantage of it.
One of the first things that I like to do is run Zenmap, which is just a GUI for nmap. This tool is useful to find open ports, which lets us know the possible ways to connect.
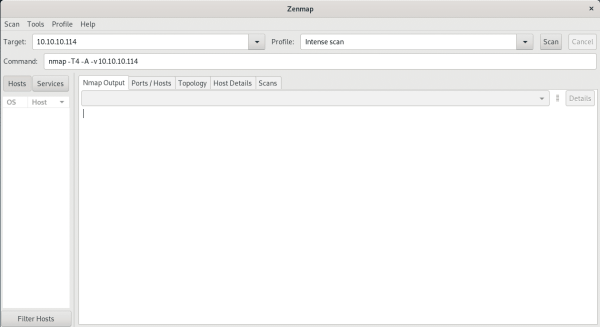
We're going to type the IP of the machine in the target field, and hit Scan. This will start nmap's process of finding common services on this machine. After Zenmap finishes running, we'll see that port 80 and 22 are open.

Since port 80, which is HTTP is open, I'm going to fire up my web browser and go to http://10.10.10.114, and see what's there.

Since there's a webserver on here, I usually think of a few different things that can be done. We can test for a SQL injection vulnerability if there's a login or mail form (which there is), we could also run DirBuster to try to find hidden files and directories, we could also check for ShellShock or something similar.
However, I'm lazy, so I'm going to start with the easiest options first. I'm going to open a new BurpSuite project, and use burp as a proxy. Burp Suite is a tool for intercepting, modifying, and replaying HTTP traffic, so it likely will come in handy on this section. After setting up the Burp Suite proxy in firefox, I'm going to go to the Target tab, click on Scope, check Use advanced scope control, hit Add in the section Include in scope, and enter 10.10.10.114 in the Host or IP range field. This will allow burp to only care about the traffic to and from that IP. When it asks about proxy history logging, I'm going to click Yes to ignore traffic from other websites.

Now I'm going to click on Proxy, and click on the button Intercept is on, to switch it to off. This allows us to use the site normally while Burp logs all traffic for us to review later. Now going to the Options tab under the Proxy tab. I'm going to check the row that says And URL Is in target scope in the Intercept Client Requests and Intercept Server Responses sections, so that we don't see the traffic we send/receive to other websites.

Now to start clicking on every link that we can find on the website. Just make sure that we're only looking around on the site with the URL 10.10.10.114. This is because this URL is in our target scope, which means that we are allowed to attempt to hack this machine.
Clicking on Help then bookmarks.html led me to find a really odd link. Hovering over Gitlab Login, I can see that the link starts with javascript:(..., which is a script. The name Gitlab Login sounds useful. Lets try running this script on the Gitlab login page. Right click on the link, and hit Copy Link Location.
Back at the Gitlab login page, open the developer tools for the web browser, and paste the link into the javascript console, and hit enter (you may have to type allow pasting first.
Notice that the link automatically put a username and password in for us. Let's log in using it.
We see two projects, and we'll continue exploring what links there are. In the code repositories, I'm seeing that deployer repository clones the code from the other repository onto the profile section of the site (which can be found by clicking on the user icon in the top right, then clicking settings). I'm also seeing that we can add code and files to the repository that it's downloading from. That seems like it'd be useful for getting access.
Getting a Shell
Looking at the index.php file in the deployer repository, we can see an if statement which says when to copy the other repository to the web server.
if ($repo=='Profile' && $branch=='master' && $event=='merge_request' && $state=='merged')
We can see in index.php that our code needs to go into the Profile repository in the master branch. Furthermore, we need to make a merge_request, and merge it in order for our code to get copied. Let's do that now.
A good place to get some "reverse shell" scripts from is from PenTest Monkey. I'm going to click on the uploadable version, and download it, as it looks better in my opinion.
I'm going to go over to the Profile repository, click on the + icon next to the master dropdown, and hit new branch. Type in a branch name, I chose dc, and hit Create branch. This creates a new branch on that repository so that we can make a merge request.
Once again, we're going to hit that + icon next to the branch we typed in, and hit new file to add a file to the repository.
Type in a file name ending with .php in the top box, and paste in the contents of the php-reverse-shell.php file we downloaded, and get our computer's IP.
This can be gotten by opening a terminal on our machine and running ip a

The only IP that we need from the output is the IP on the tun interface, which is our IP in the VPN.
Modify the IP on line 49 of the script to yours, and choose a random number for the port on the next line. I chose 10001 as the port I'm going to use.

Click the button Commit changes, so that it's added to our branch, and click on Create merge request. This starts the process of merging our code into the master branch. Click on Submit merge request, check the Remove source branch button, and click on the Merge button. This adds our code to the master branch.
Click on the profile icon on the top right, and click on Settings to get to the profile page (where our code is going).
Opening the terminal again, we can use nc to listen for a connection from the web server, which should give us our shell. Open up a terminal and run nc -lvnp [port], replacing [port] with the port number. While leaving that program running, go back to your web browser, and add the filename we typed in earlier at the end of the URL.

Notice that the page is taking forever to load, and end with a 504 error. That's totally okay. Check out the terminal, and you'll see that the website has connected to your machine, and given you a shell.
